Create Loan
Once the client information has been updated, we can begin with the Loan Application.
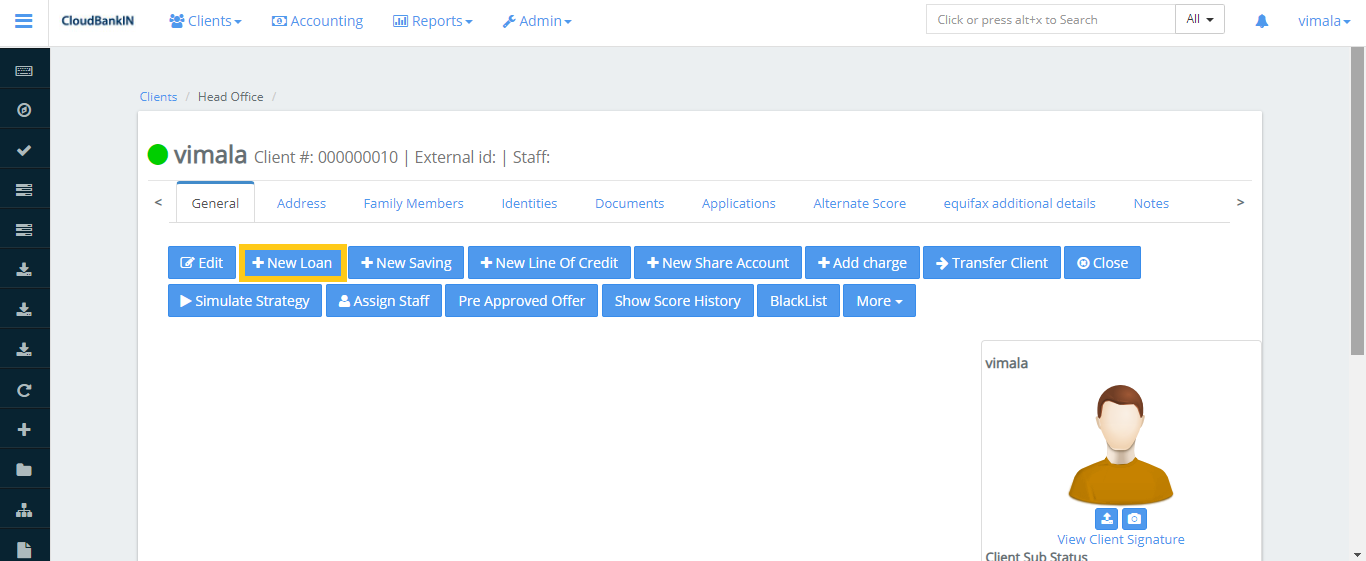
Click on the New Loan and select the Loan Product you are going to offer. In the Loan Product drop-down, it shows the Product Name which already exists. ( You can add a Loan Product name in Admin ->> Products ->> Loan Products ->> Create New Product (Refer: Product Creation)) .
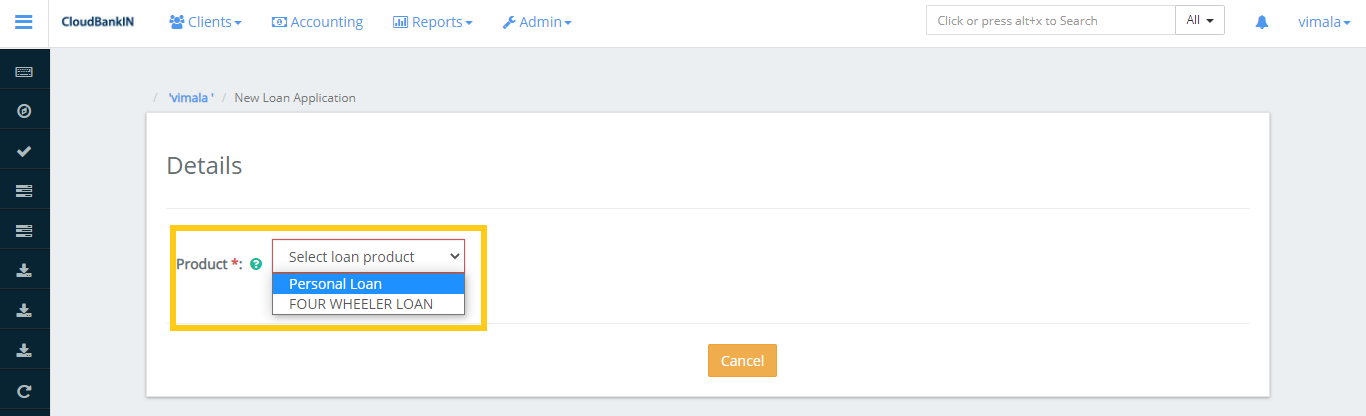
Once the Product is created you can see the New Loan Application form.
Update the Mandatory informations and click Next.
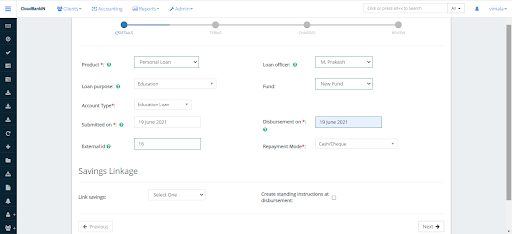
Field Name and Description
- Product (*) – Select the type of loan your offering
- Loan purpose – Select the purpose for the loan. E.g, ( Education, Vehicle etc.,) (You can add in Admin ->> Manage Codes ->> search Loan Purpose and select ->> click on Add Code Values)
- Account Type (*) – Select the type of loan you’re going to offer and these values are provided by RBI guidelines. (You can add in Admin ->> Manage Codes ->> search Account Type and select ->> click on Add Code Values)
- Submitted on (*) – Choose the date of loan application submission
- External ID – Specify any unique identifier to refer the client in future
- Loan Officer – Choose the Loan Officer name from the drop-down
- Fund – Choose the Fund Name from which you’re going to provide loan
- Disbursement on (*) – Choose the date when the loan is expected to disburse
- Repayment Mode (*) – Choose the Repayment Mode from the drop-down (ie., Cash/Cheque, Nach) (You can add in Admin ->> Manage Codes ->> search RepaymentMode and select ->> click on Add Code Values)
- Link Savings – If your deposit taking nbfc you can link to your loan accounts to the individual customers saving account
- Create standing instruction at disbursement – By selecting this option, the amount will be automatically detected from the client’s account as per the standing instruction specified.
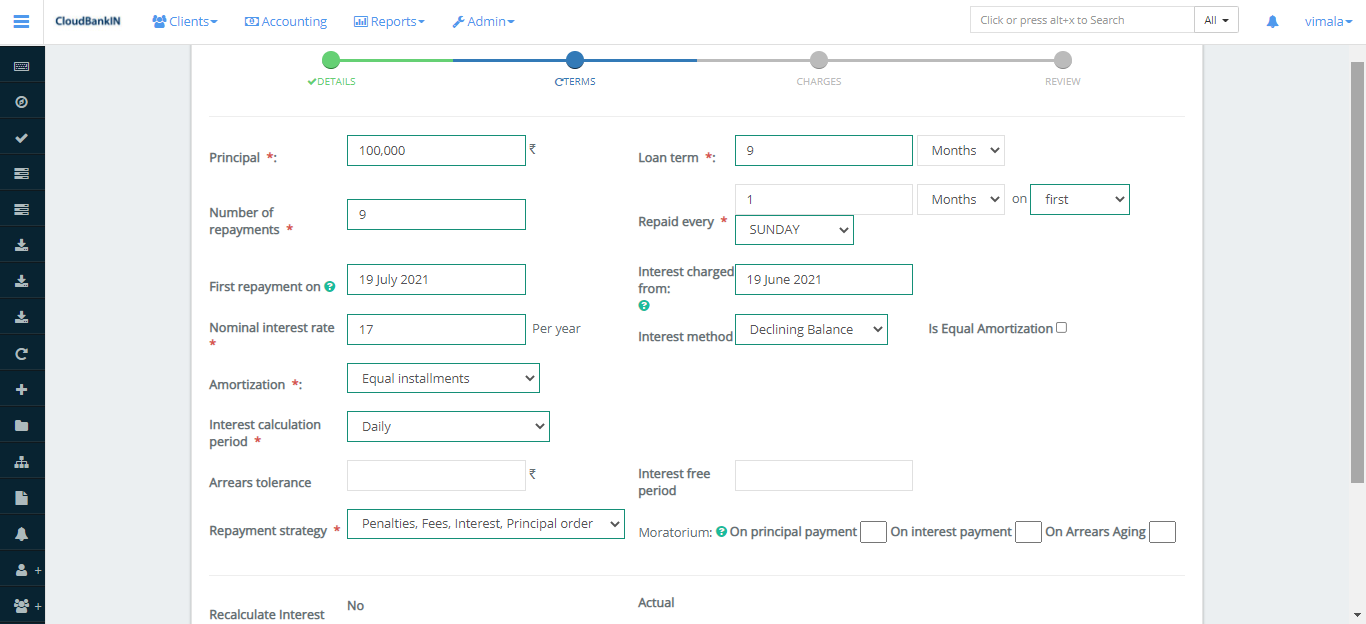
Once you have updated the information in the Details click on Next. In the Terms form update the mandatory information.
Field Name and Description
- Principal – Specify the amount borrowed from the lender
- Loan Term – Specify the repayment period for the loan amount ( ie, Days, Weekly, Monthly, or yearly)
- Number of repayments – Mention the number of repayments that must be made over the period specified
- Repaid every – Specify the repaid schedule details (ie, Days, Weeks, Months, Years). If you choose Month you can even select the week and day which you want to repay
- First repayment on – You can manually choose the First repayment Date, else the system will automatically assign the date based on the loan submission date
- Interest Charged Form – You can manually choose the Interest Charged Form, else the system will automatically assign the date based on the loan submission
- Nominal interest rate – Specify the interest rate fixed by the lender per year
- Interest Method – Choose whether you want a Flat or Declining Balance for the Interest calculation
- Flat – The interest flat and principal components of all repayments is the same for the life period
- Declining Balance – Specifies the interest rate will be calculated as per the outstanding amount, basically Interest will decrease as the outstanding amount decreases.
- Is Equal Amortization – Specifies the loan repayment will be the same for all the installment. This loan is repaid in equal installments under this type of repayment
- Amortization – Choose either Equal Installments or Equal Principal Payments
- Equal Installments – Specifies the loan repayment amount will be the same for all the installments, but the principal and interest amounts will vary with each repayment
- Equal Principal Payments – Specifies the principal amounts will be equal but the repayment and interest amounts will vary with each repayment
- Interest calculation period – Choose either Daily or Same as Repayment Period
- Daily – Interest will be calculated on a daily basis. (eg., February Month has 28 days. So it will calculate for 28 days)
- Same as repayment period – Interest will calculate on the basis of the repayment period (eg., By default it will calculate for 30 days per month)
- Calculate interest for exact days in a partial period – It calculates the interest for the exact days in the repayment period. For e.g, If I got a Loan on 25th June’21 and my repayment period is 5th July’21. It will calculate the interest for the exact 11 days. And for the next repayment it will be calculated for 31 days.
- Arrears tolerance – Specifies the maximum amount we can tolerate before moving it to Arrears.
- Interest-free period – Specify the interest-free period for the loan amount (ie., If the Interest-Free Period is ‘4’ and the client’s repayment frequency is every week, then for the first four weeks the client need not to pay interest, he has to pay principal due for that week only)
- Repayment strategy – The repayment strategy determines the sequence in which each of the components is paid. Choose any one value from the drop-down to process the repayment.
- Penalties, Fees, Interest, Principal Order
- Overdue/Due Fee/Int/Principal
- Principal, Interest, Penalties, Fees Order
- Interest, Principal, Penalties, Fees Order
If a repayment is to be made, it will be checked in the order listed above. For e.g. I’m taking the third option, If you have a loan with an installment and it is overdue. The instalment amount is 550 dollars (500 Principal, 20 Interest, 15 Penalties, 15 Fees) but you’re paying only 510rs. In this case it will reduce the amount in the specified order (Remaining amount will be 10 Interest, 15 Penalties, 15 Fees)
-
Moratorium – A moratorium period is a period during which the borrower is not required to make any payments on the loan.
-
- On principal payment – If the Principal Payment is ‘6’ and the client’s Repayment Frequency is every month, then for the first six months, the client has to pay Interest-only and after six months the client starts paying the principal amount.
-
- On interest payment – If Interest Payment is ‘6’ and the client’s Repayment Frequency is every month, then for the first six months, the client has to pay only the principal and after six months the client starts paying the interest amount.
-
- On Arrears Aging – Number of days a loan maybeoverdue before moving into arrears (ie., If 10 is specified, in arrears aging value, the loan will be in arrears on the 11th day after a scheduled payment is missed.
-
Recalculate Interest – If you select the checkbox, system will recalculate the interest based on the outstanding amount for the mentioned period
-
Actual – Specifies the interest will calculate for actual calendar days
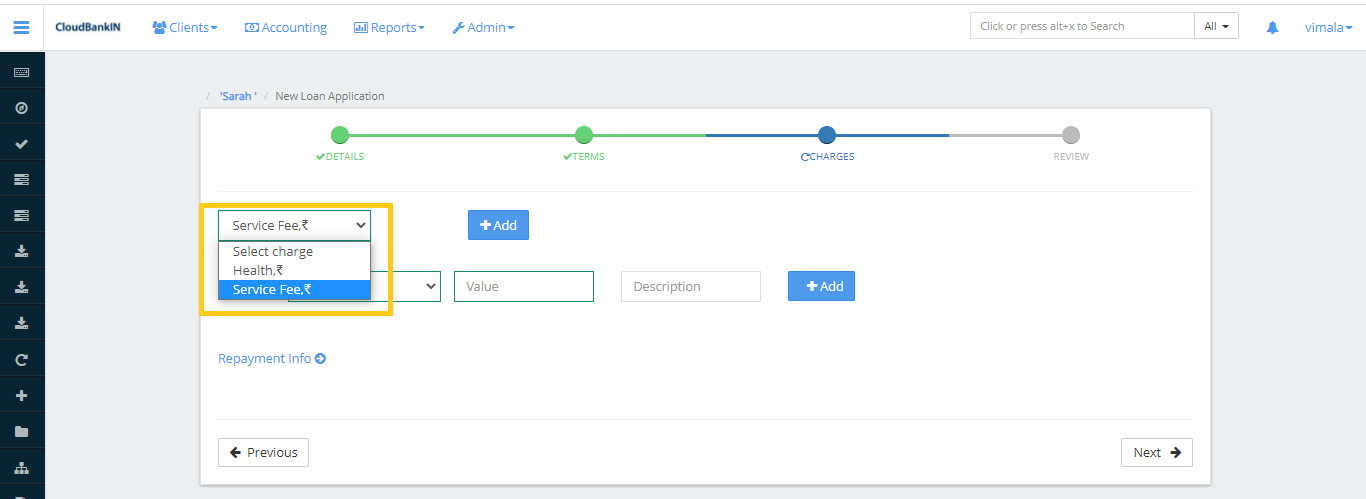
In the charges form select the charge you want to deduct and click on Next. Click here to know how to add charges.
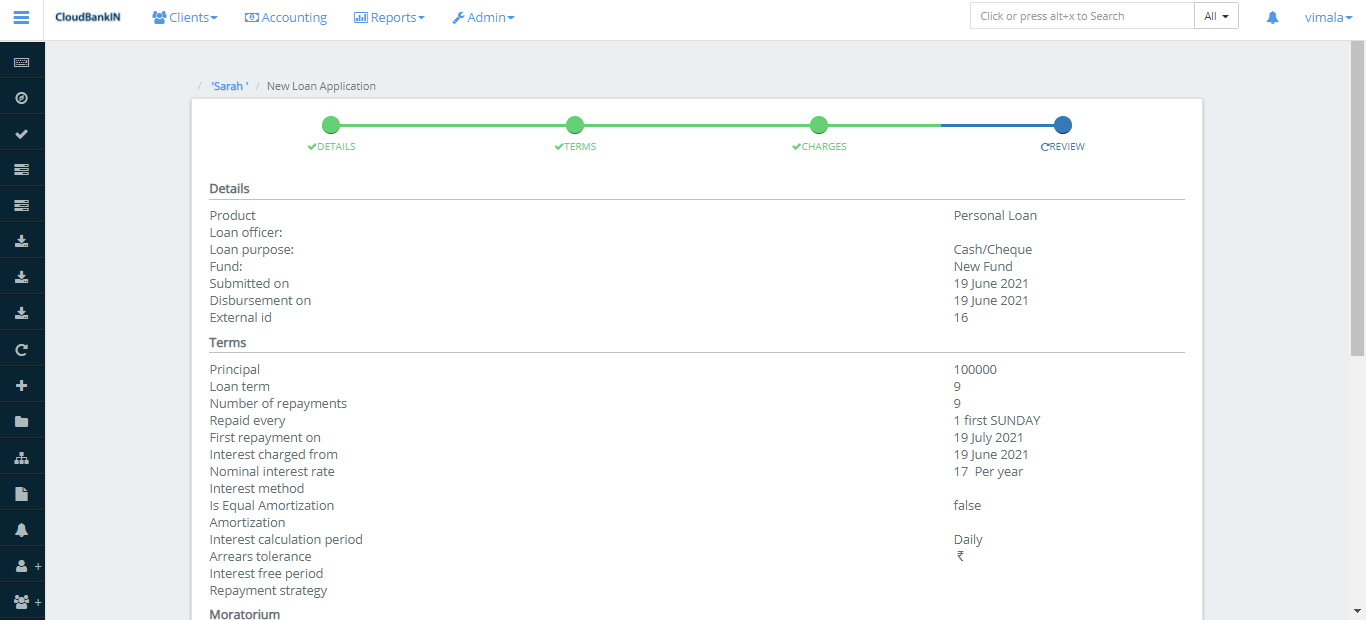
Check the details in the Review form, then click Submit if everything looks good.
Now the Client’s Loan Account form will display.
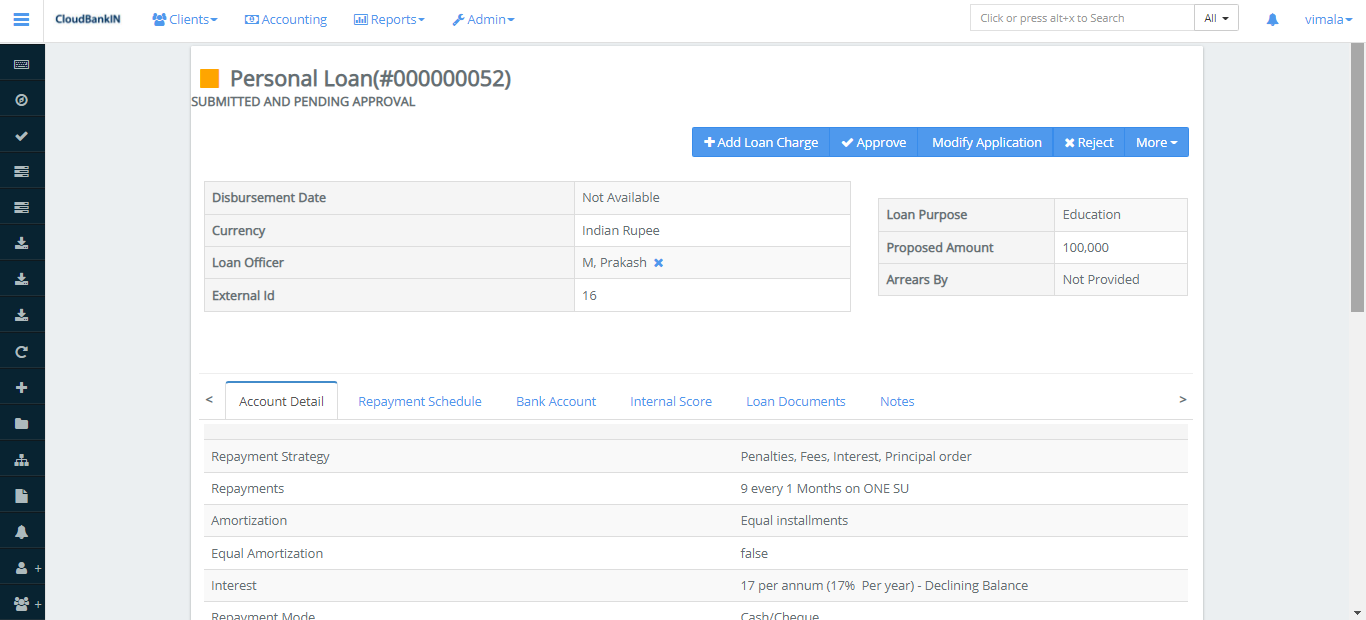
Menu Name and Description
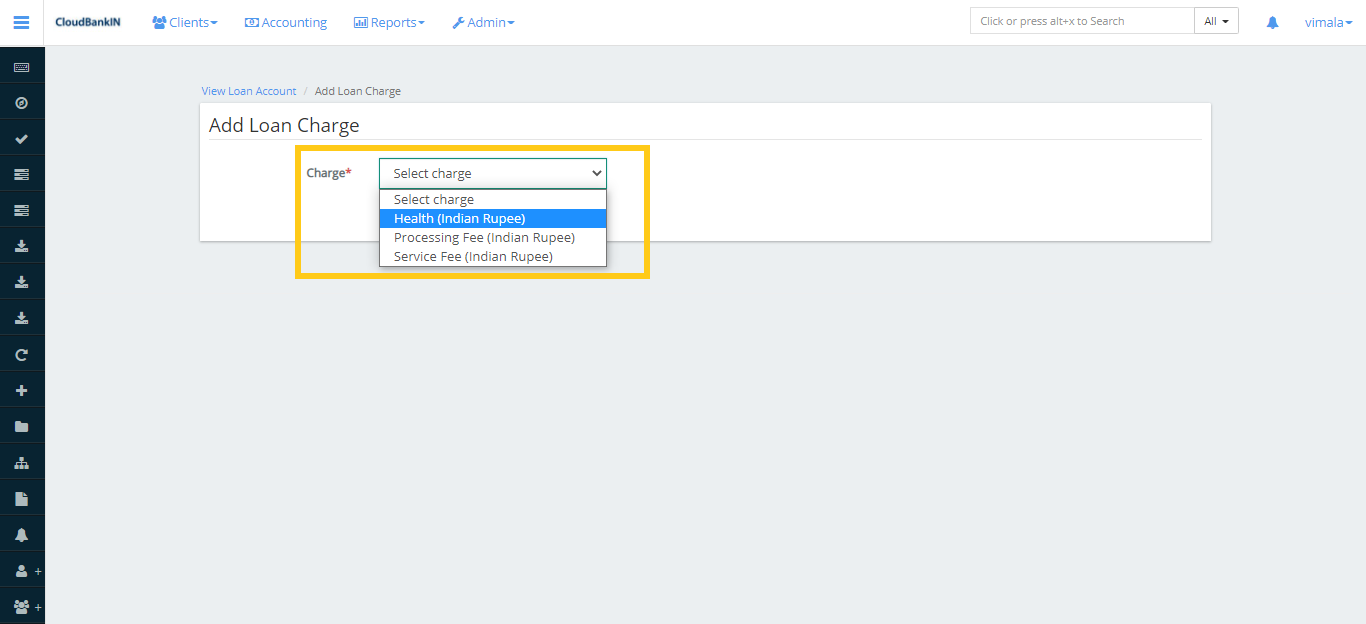
- + Add Loan Charge – If you want to change the Charge value you can do it here. Select the Charge from the drop-down and enter the amount you want to add as charge. Charge Calculation & Charge time you can choose it when you’re creating the Charge.
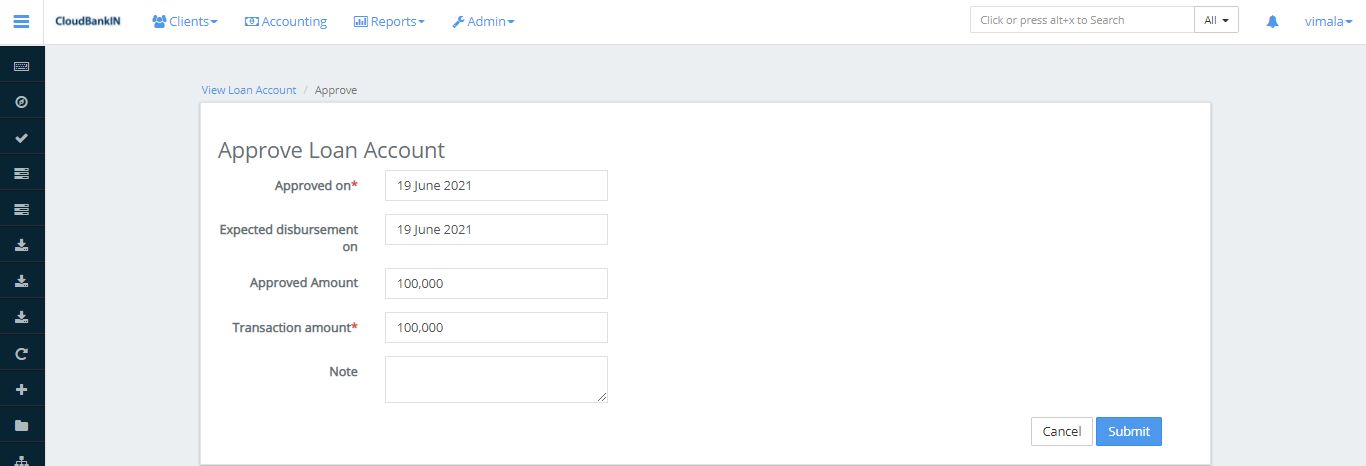
- Approve – Once the Loan is created you can verify and Approve it
- Modify Application – If you want to Modify the loan application details. It will return to the application form you can make the necessary changes and then click Submit
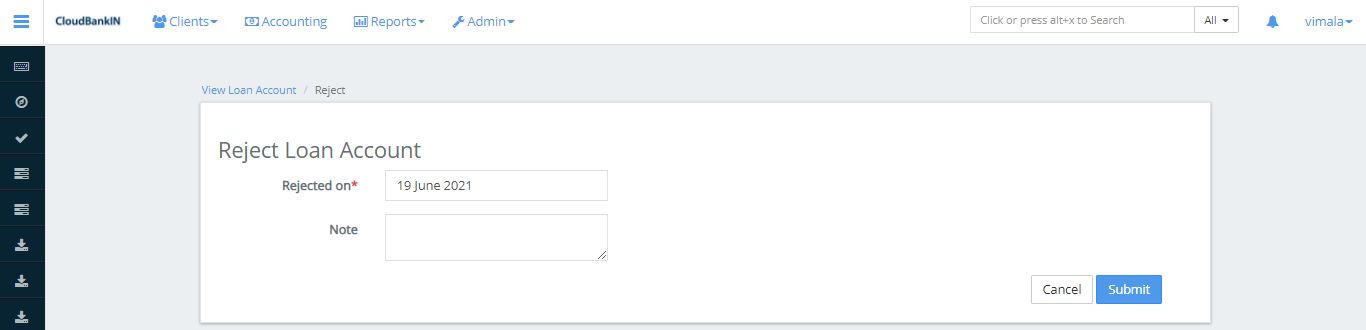
- Reject – If you want to reject the loan application, click Reject and choose the date you want to reject it, then click Submit
More ->
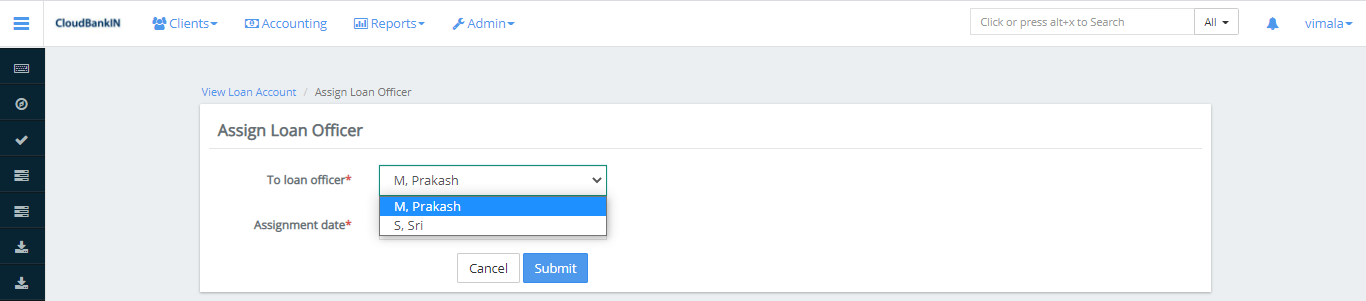
- Change Loan Officer – If you want to change the Loan Office you can do it here
- Withdrawn by client – If a client wants to withdraw the loan you can click here and select the date and Submit.

- Delete – If you want to delete the Loan Account you can just click once and it will delete the loan account
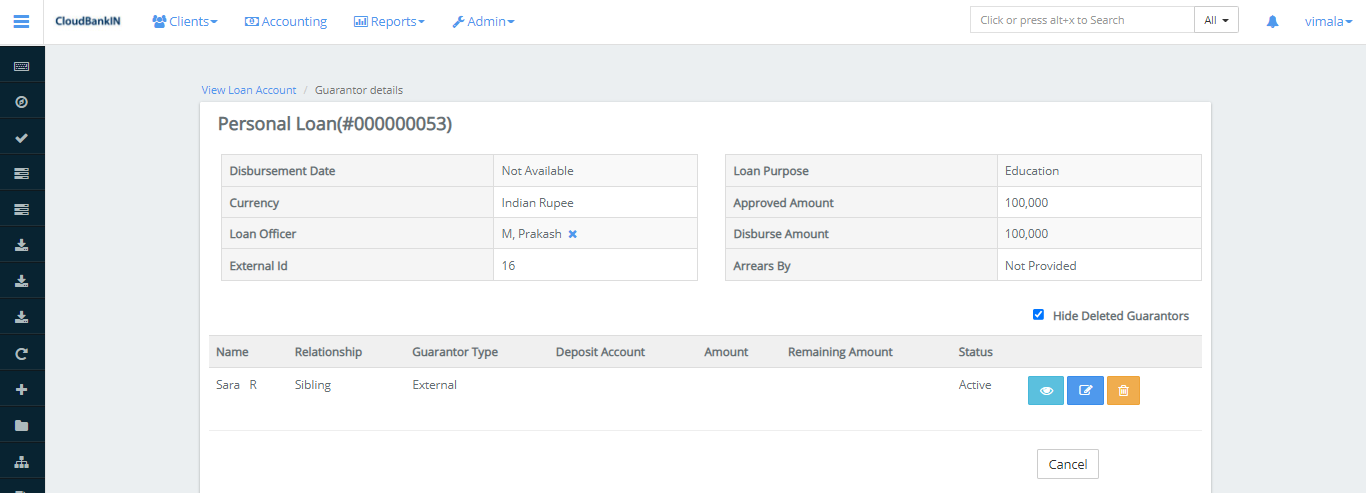
Create Guarantor
You can update the Guarantor details in this form. If the Guarantor is an existing client then select the checkbox and specify the guarantor name and relationship. It will automatically fetch the corresponding details, then click Submit
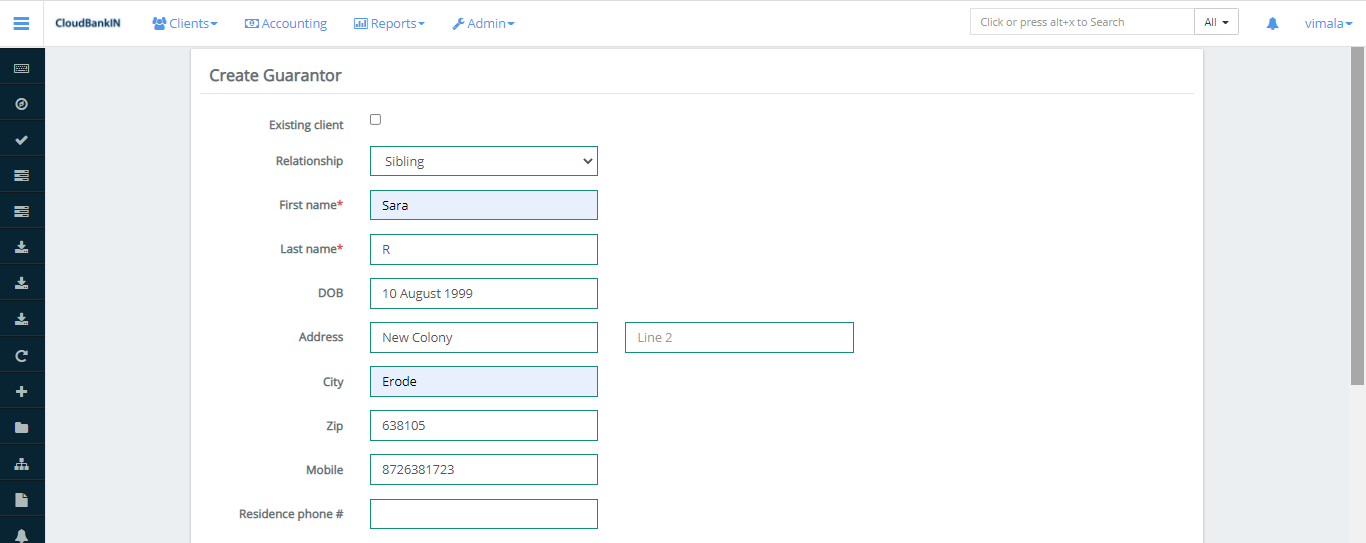
If the Guarantor is a new person then uncheck the Existing Client.
- Relationship – Select the relationship with the Guarantor
- First Name(*) – Specify Guarantor’s First Name
- Last Name(*) – Specify Guarantor’s Last Name
- Date of Birth – Select the Guarantor’s Date of Birth
- Address – Specify the Address of the Guarantor
- City – Specify the City of the Guarantor
- Zip – Specify the Zip Code of the Guarantor
- Mobile Number(*) – Specify Guarantor’s Mobile Number
- Residence Phone# – Specify Residence Phone of the Guarantor
Additional Details
- Income Details – Enter the yearly income details
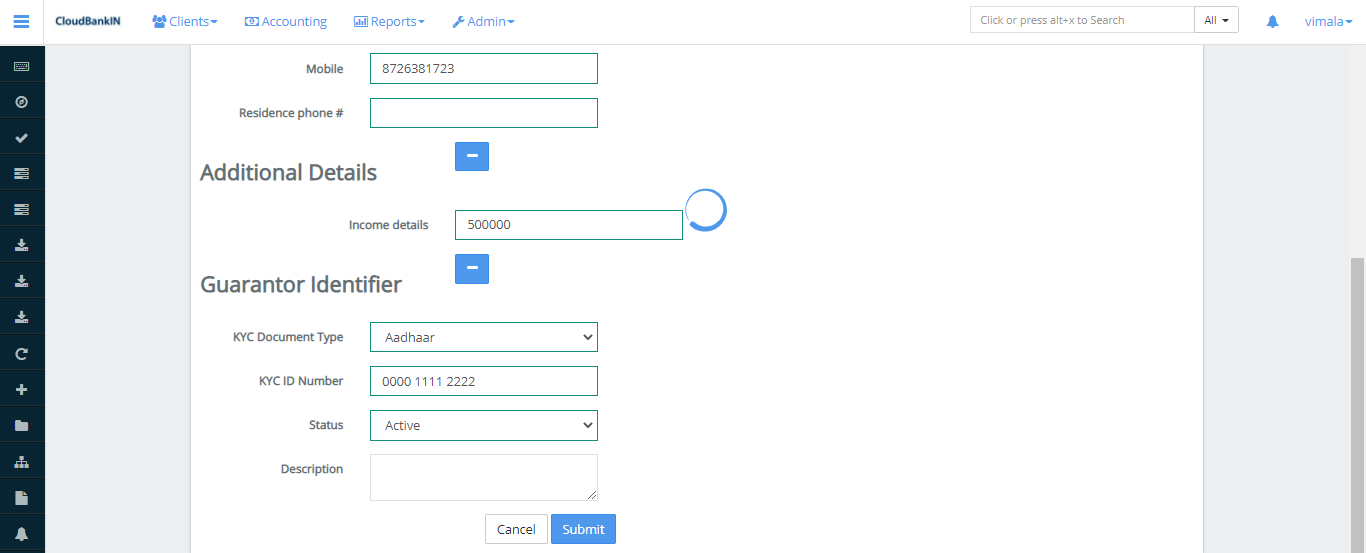
Guarantor Identifier
- KYC Document Type – Choose the document type from the dropdown
- KYC ID Number – Specify the corresponding document id number
- Status – Choose the status of the document (ie. Active or Inactive)
- Description – Specify the description if any
Once updated the Guarantor informations click Submit
- View Guarantor – If you want to view the guarantor details you can click on this menu
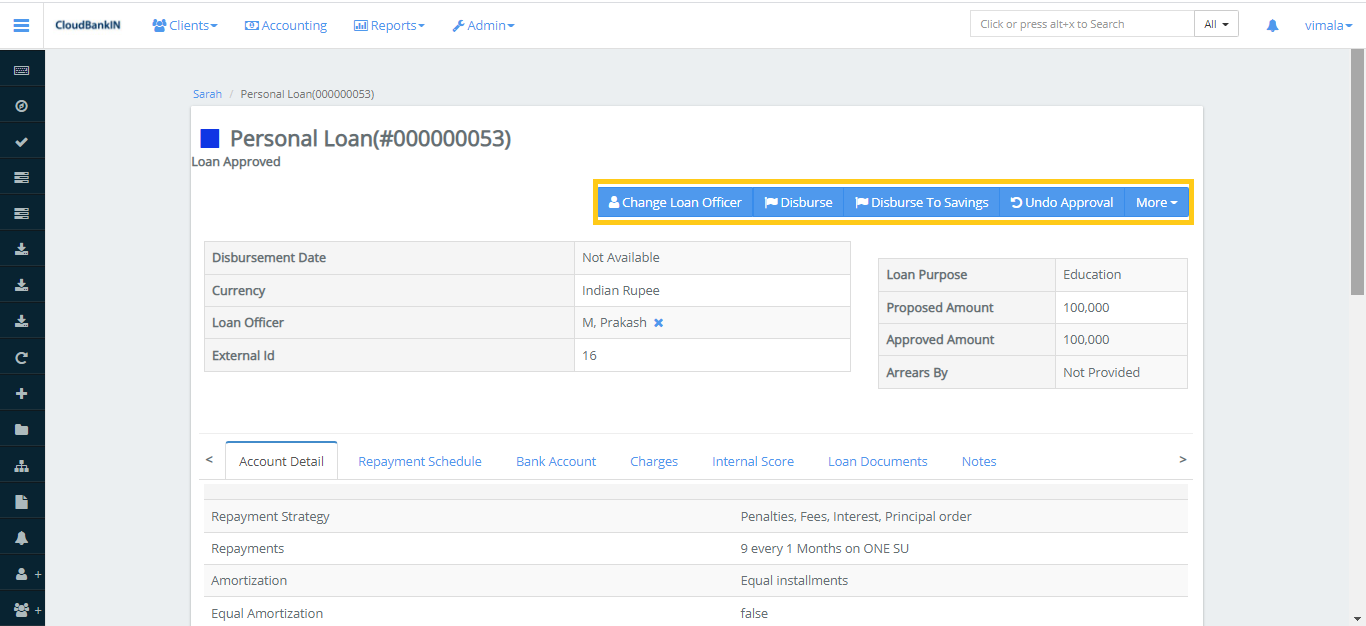
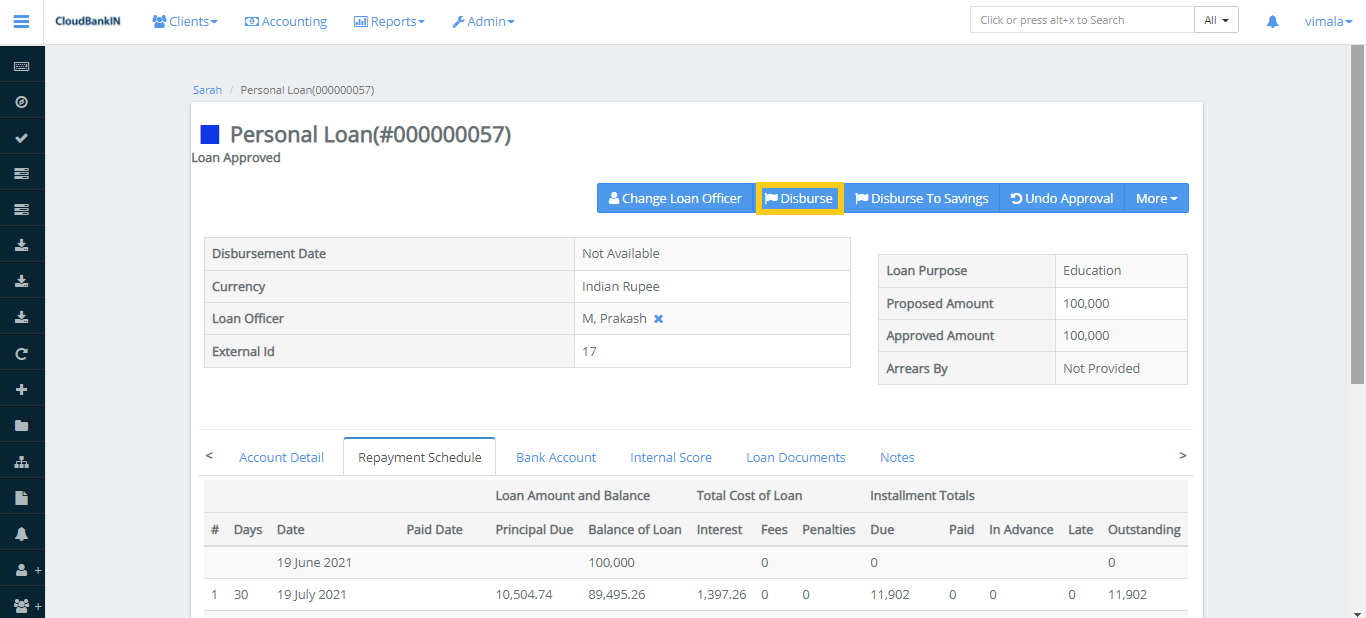
Once the Loan is Approved you can see the below menus,
-
Change Loan Officer – If you want to change the Loan Office you can change it here as previously mentioned
-
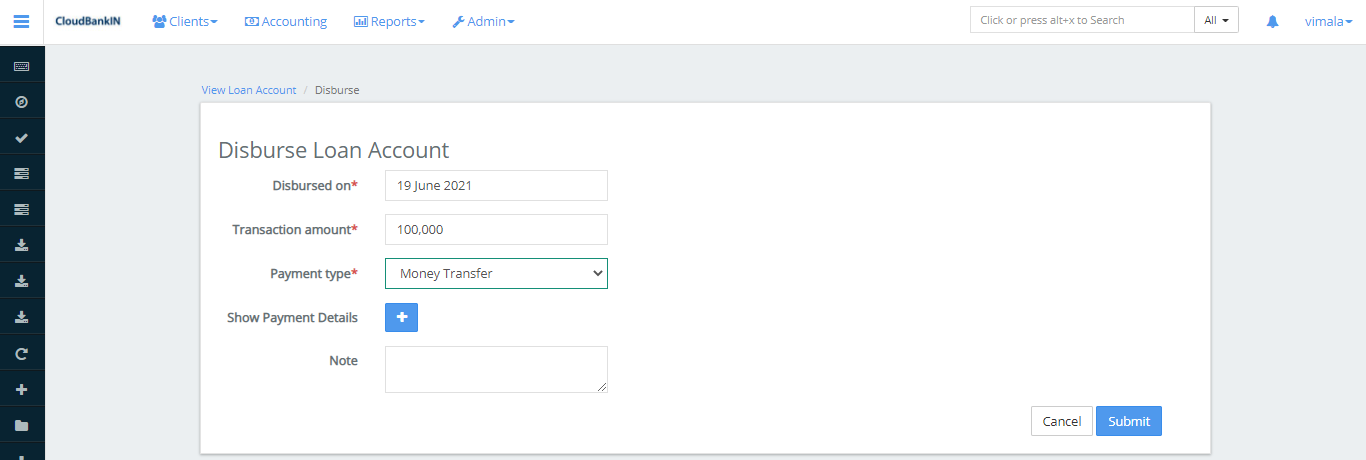
Disburse – Here you can disburse the loan amount to your client. In this form select the disbursement date, disbursement amount, and payment type, by default it is Money Transfer.
To update the further payment details click on the + beside Show Payment Details and complete the relevant fields
- Account# – Specify the account number of the client
- Cheque# – Specify the cheque number of the client
- Routing Code – Specify the routing code for the particular branch (You can get this in the bottom left corner of your cheque)
- Type Receipt – Specify the receipt type
- Bank# – Specify the name of the bank
- Payment Channel – By default it will be none
- Disbursed to – By default it will be none
- Note – Specify if any notes for future reference
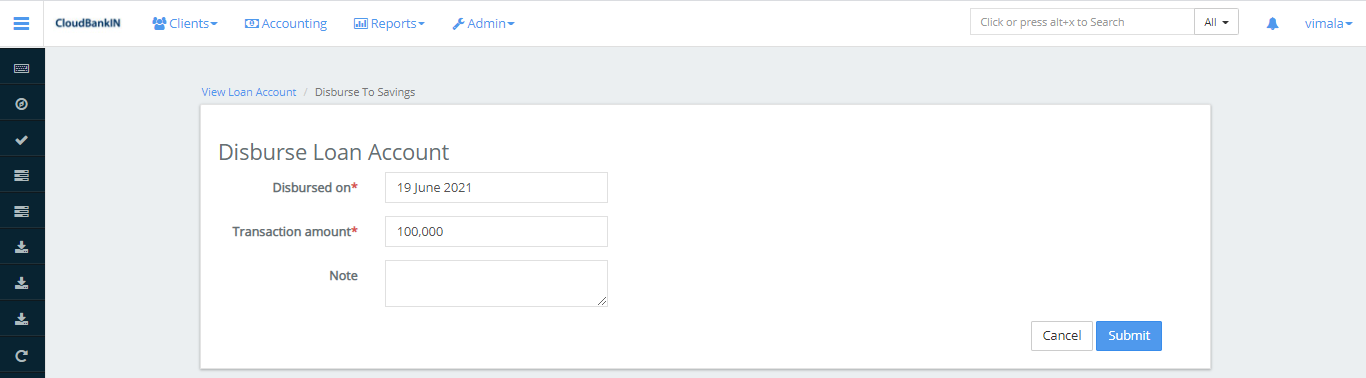
- Disburse to savings – You can disburse the amount to the client’s saving account. Refer information canceled,disbursement date and enter the amount you want to disburse, then click Submit
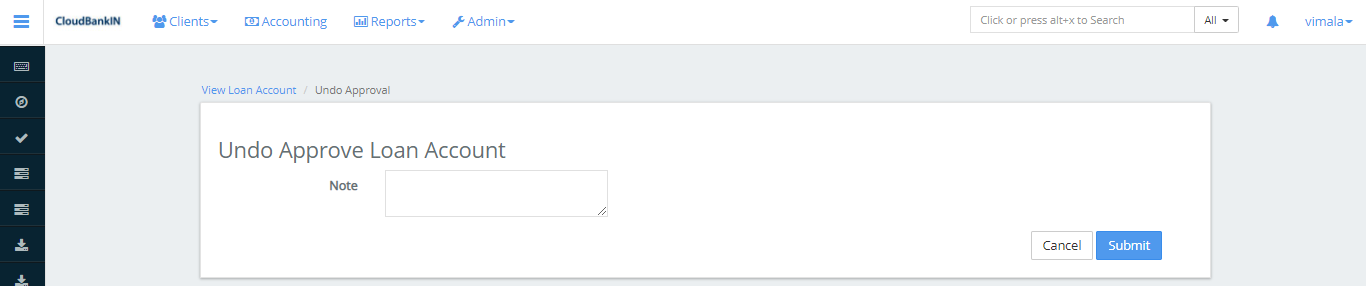
- Undo Approval – If you want to undo the loan approval you can do it here by clicking on Submit
Once you have approved the loan amount you will get all the details as below,
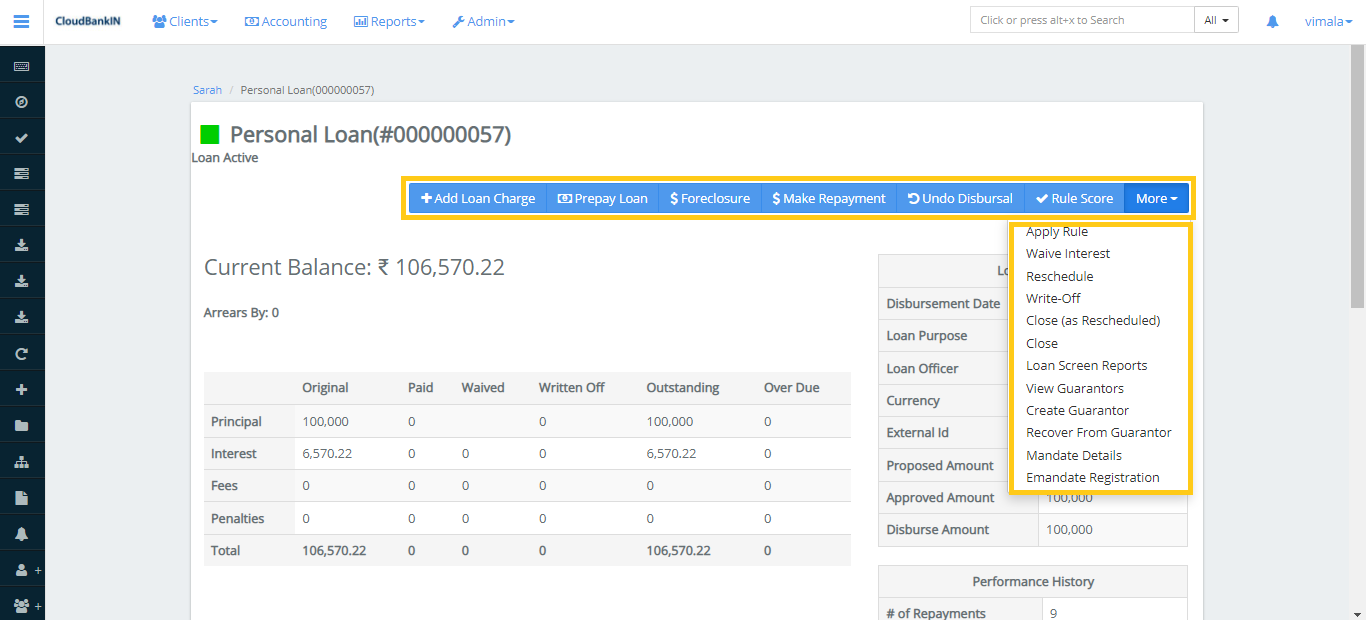
Menu Name and Description
Prepay Loan – Specifies the entire loan amount is paid before the repayment period ends. Once you click on the Prepay Loan it will ask for the following details.
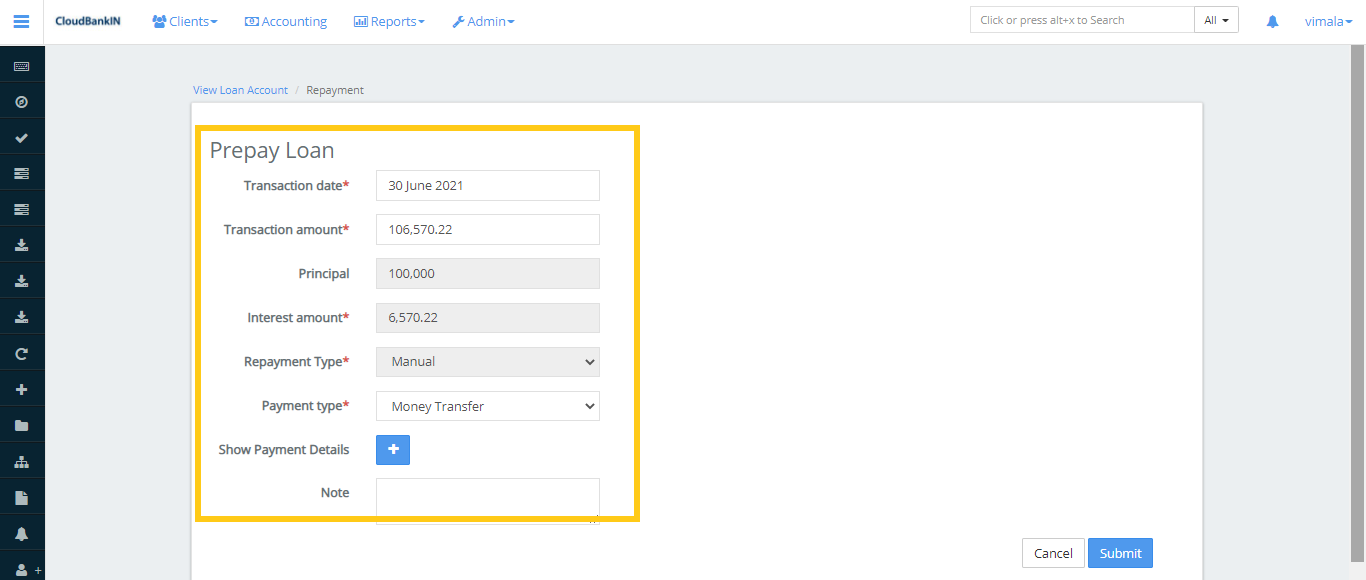
- Transaction date (*) – Specifies the amount transaction date
- Transaction amount (*) – Specifies how much amount you want to transfer
- Principal – Principal Value will be automatically updated by the system
- Interest amount (*) – Specifies the interest amount for the particular period
- Repayment Type (*) – Specifies the repayment type (eg, Manual)
- Payment type (*) – Select Money Transfer
- Show Payment Details – Click on the (+) sign and you will get the below details
- Account# – Specify your bank account number
- Cheque# – Specify your Cheque number
- Routing code – Specify your routing code (You can get this in the bottom left corner of your cheque)
- Receipt# – Specify the receipt number
- Bank# – Specify the Name of the Bank
- Note – Specify if any notes for future reference
Update the above details and click on Submit
$ForeClosure – Specify that the customer repays the entire loan amount before the due date.
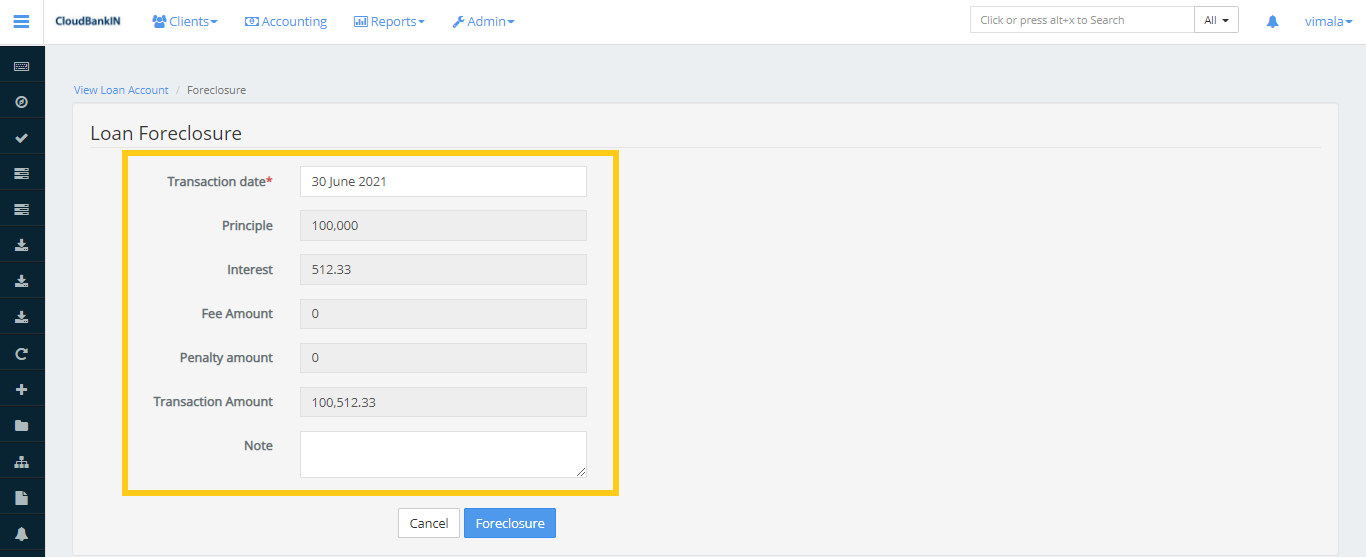
Transaction date (*) – Specifies the amount transaction date
- The rest of the fields are automatically updated by the system
- Click on Submit
$ Make Repayment – Refers to the payment of a borrowed amount from Lender.
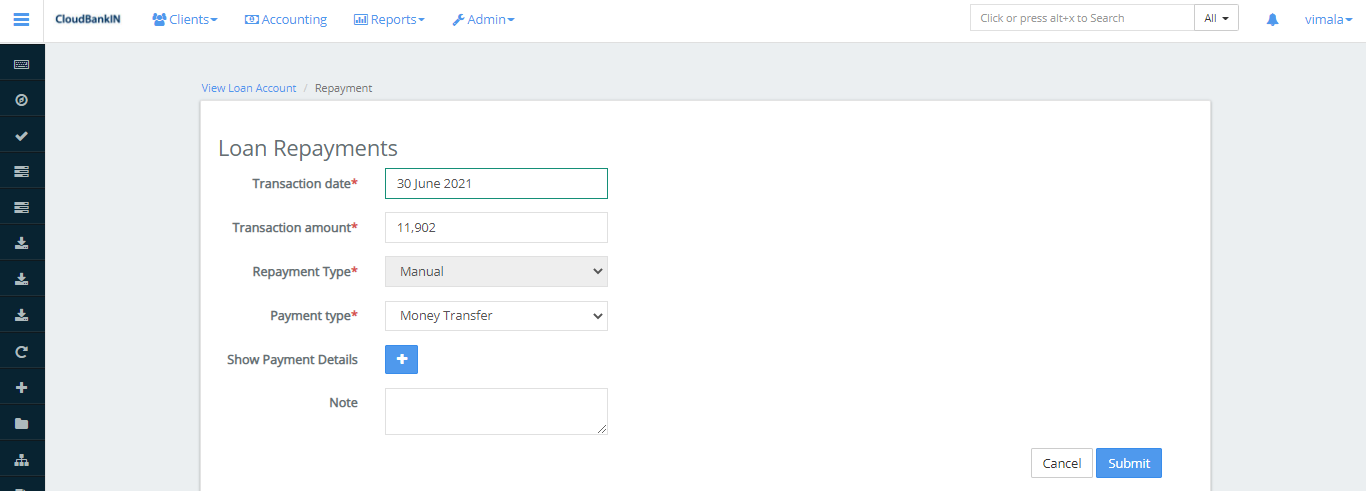
- For fields and descriptions please refer to the Prepay Loan. Once updated the fields click on Submit
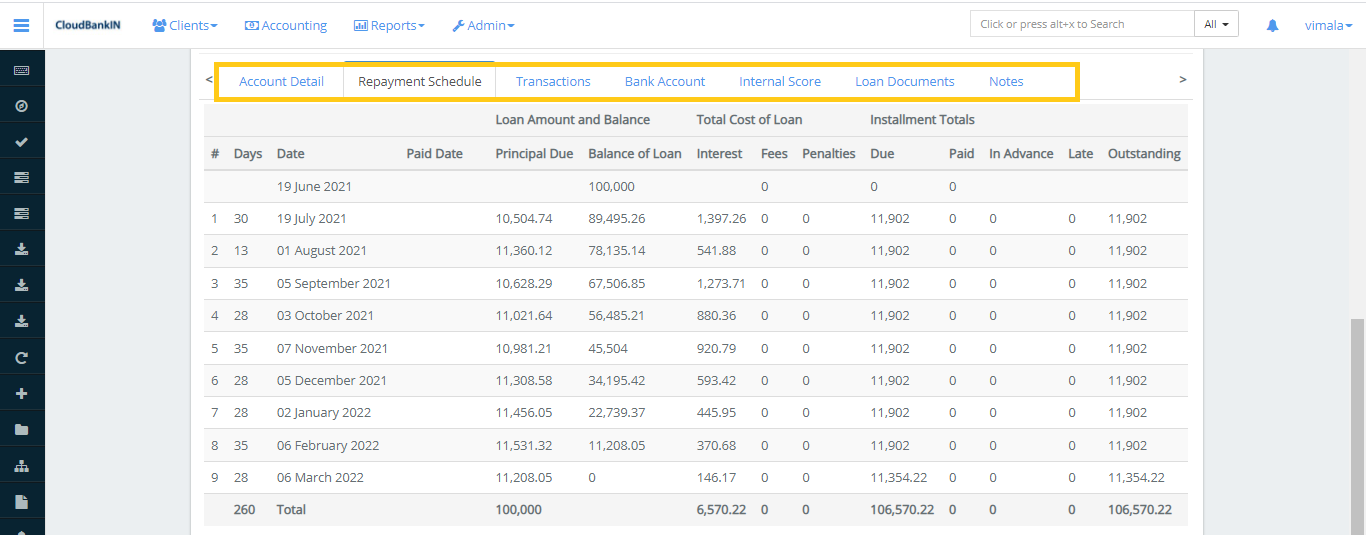
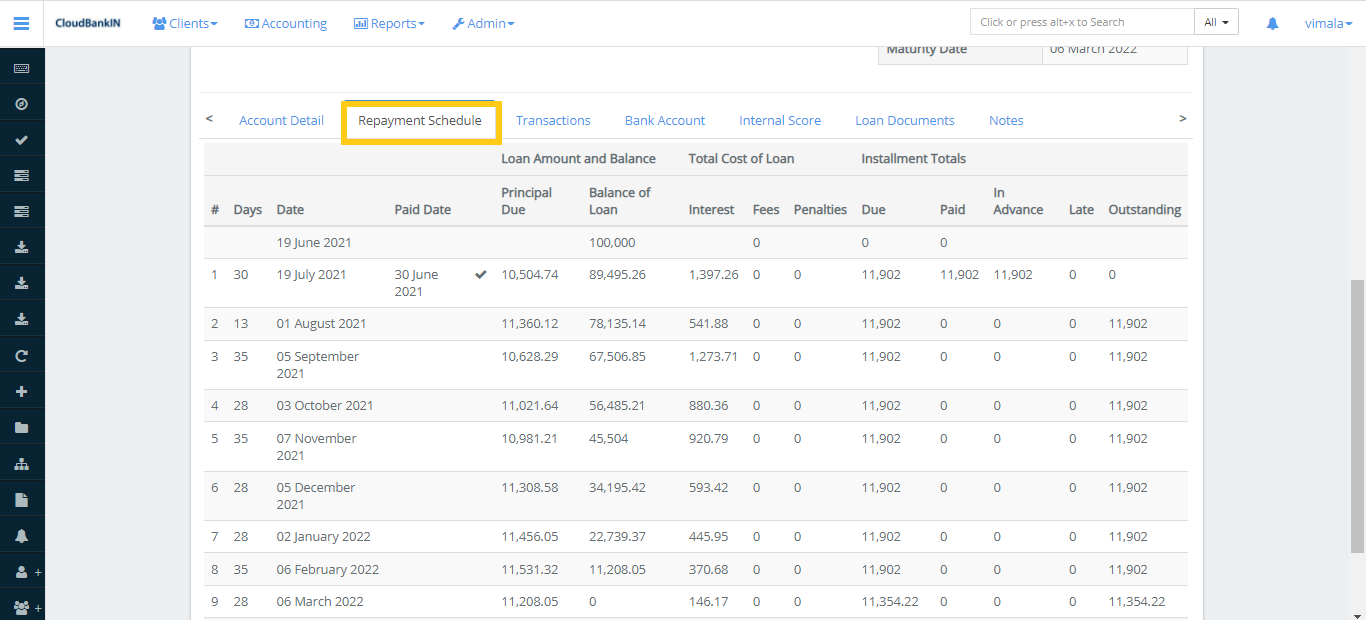
- Now in the Repayment Schedule, you can see the transaction details
- The due amount of 11,902 is paid and the Balance of the Loan amount is shown in the table
Undo Disbursal – Refers to undoing the disbursal amount which we made earlier.
Click the Undo Disbursal button, then specify if you have any notes here, before clicking Submit.
As you can see, the disbursed loan amount has been cancelled
Waive Interest – It specifies you can waive interest on the loan account.
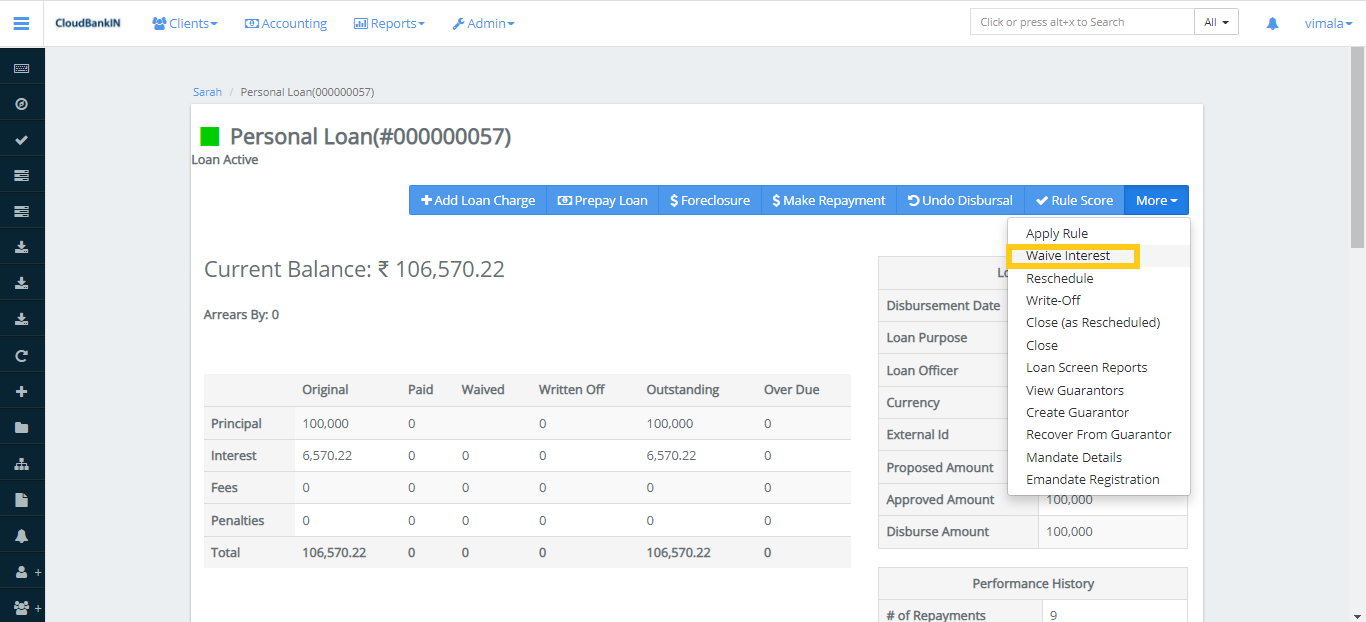
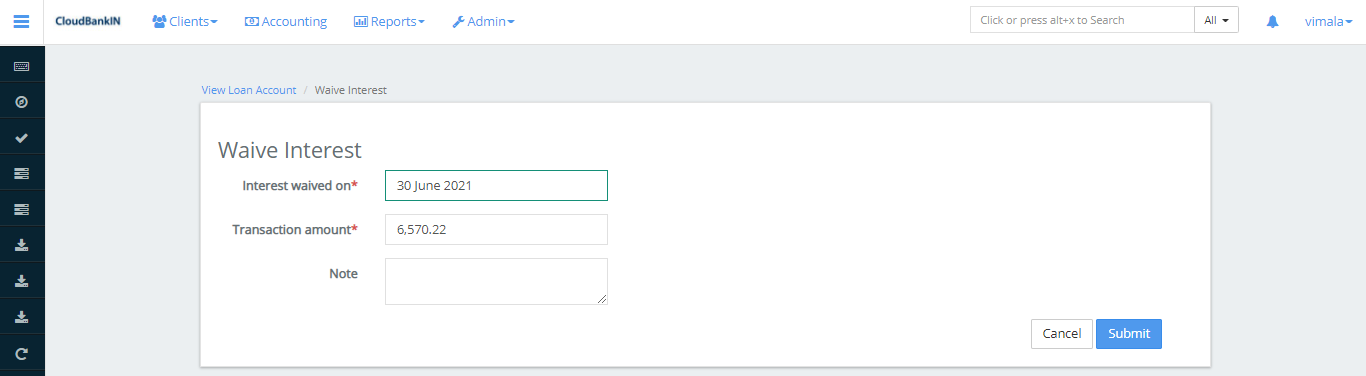
- Select the interest date you want to Waive.
- Specify the amount you want to waive. Still once you have selected the date by default it will show the corresponding interest amount for the period
- Once updated the date and amount click on Submit
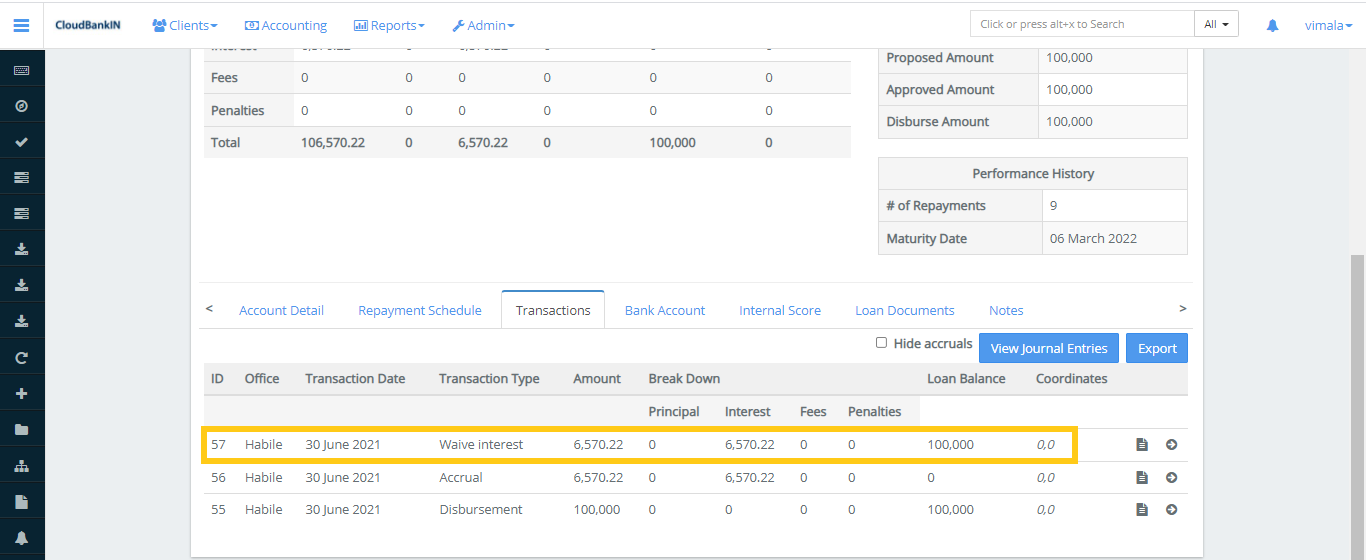
- Now in the Transaction tab,the you can see the waived interest details
Reschedule – Refers to reschedule the Installment amount which you need to pay.
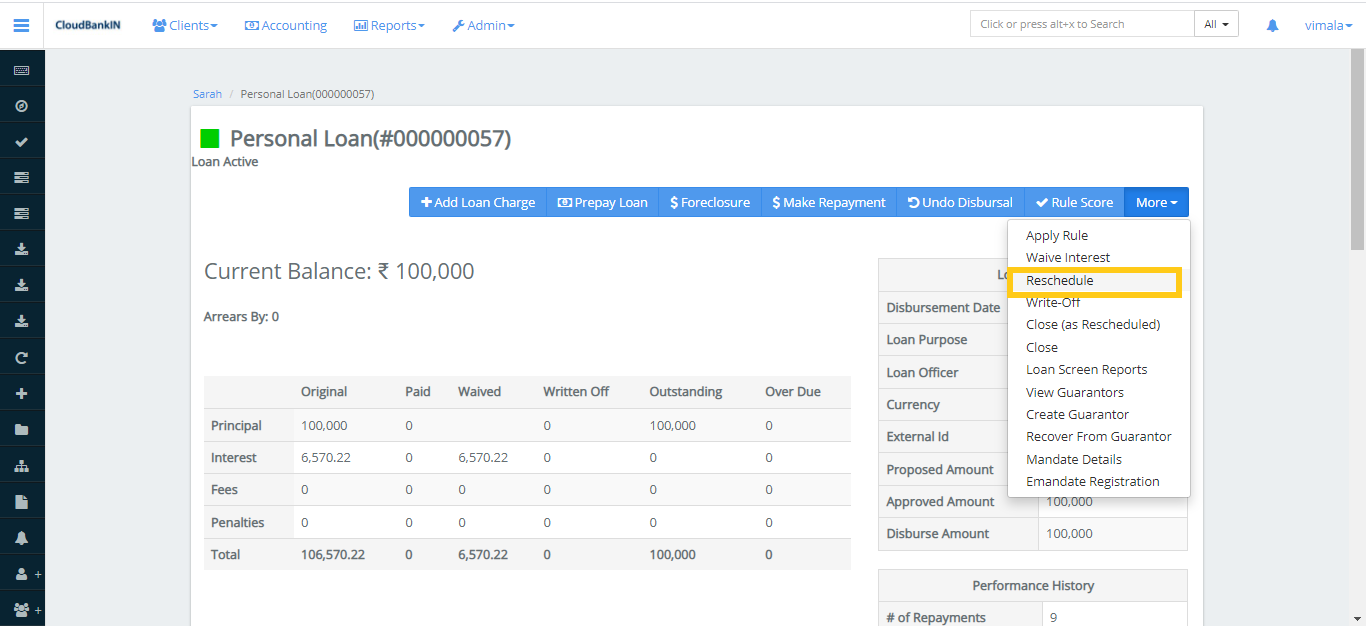
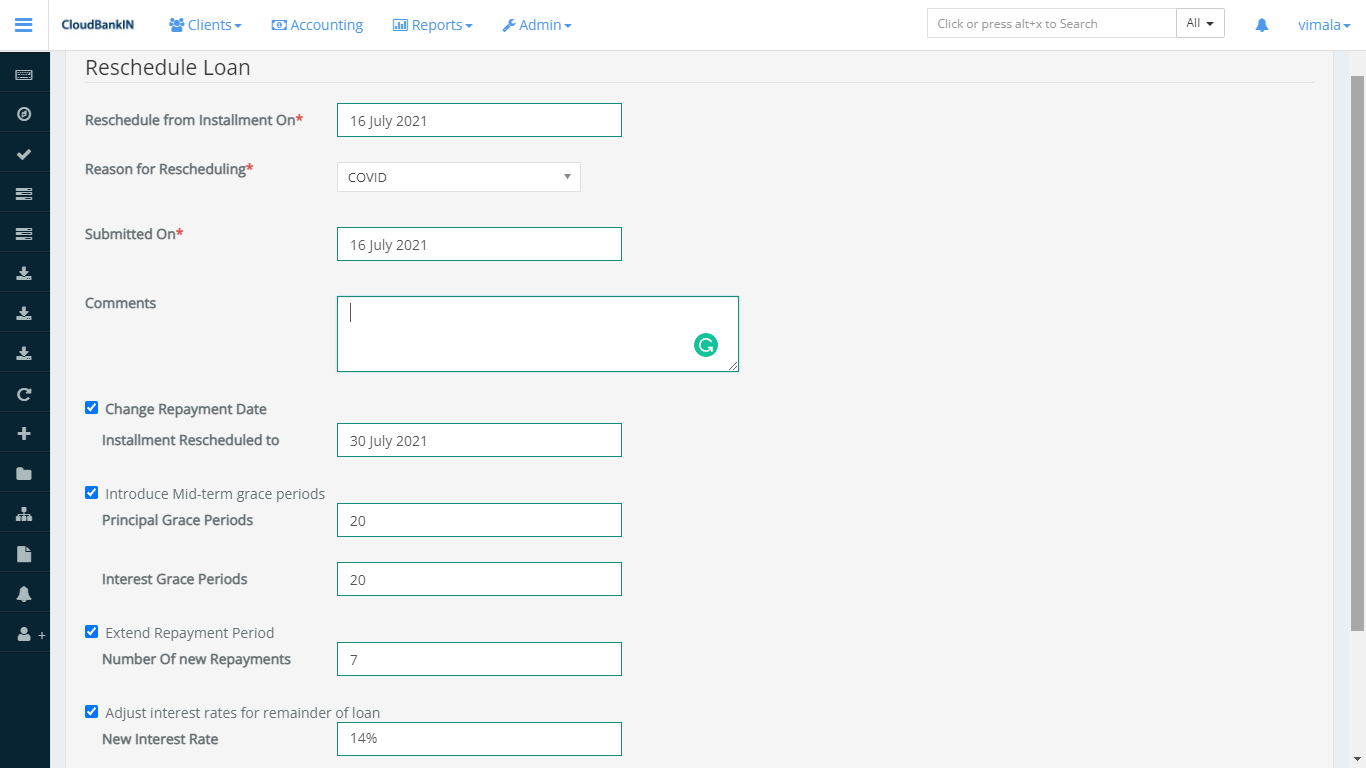
Menu Name and Description
- Reschedule from Installment On (*) – Provide reschedule installment on date
- Reason for Rescheduling (*) – Provide reason for rescheduling
- Submitted On (*) – Select the date to submit the reschedule information
- Comments – Specify any comments you want to refer to in future
- Change Repayment Date – Installment Rescheduled to – Specify the installment rescheduled date
- Introduce Mid-term grace periods – Principal Grace Periods – Specify the grace period for principal, Interest Grace Periods – Specify the grace period for interest
- Extend Repayment Period – Number of new Repayments – Specify the number of new repayment period once it is extended
- Adjust interest rates for remainder of loan – New Interest Rate – Specify the new interest rate for the remaining repayment period
Write-Off – Specify that a client’s loan will be written off by the bank. The loan account will be automatically closed once the loan has been written off.
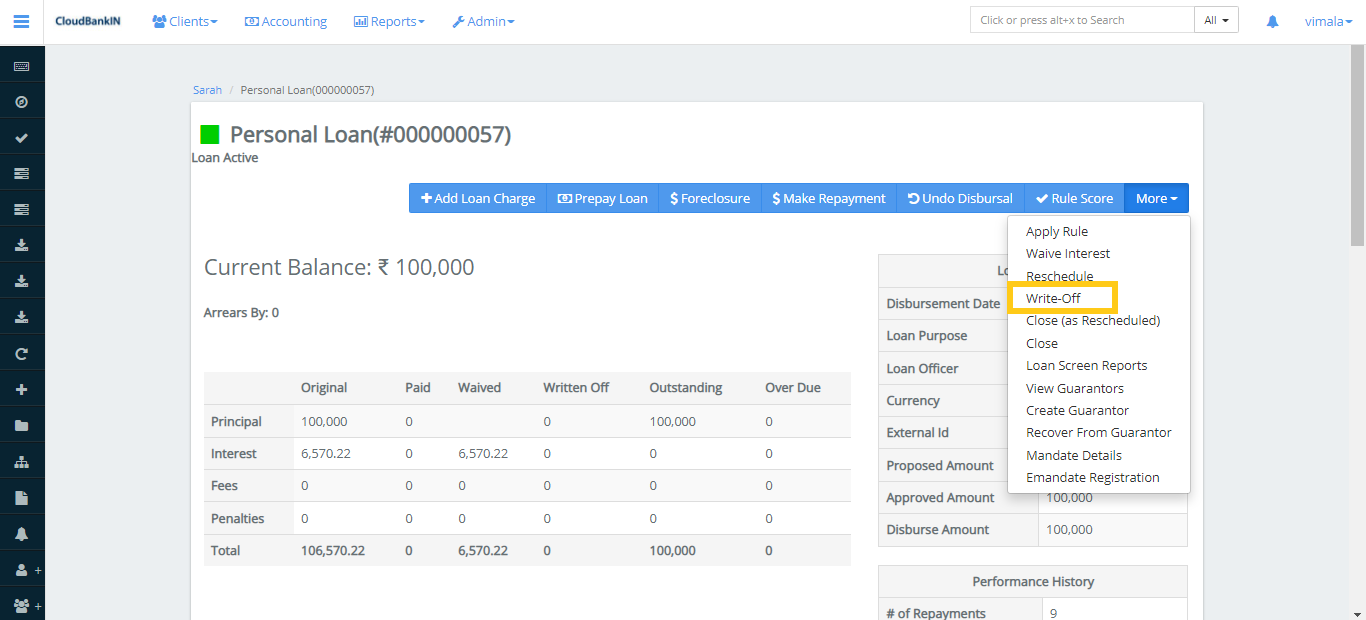
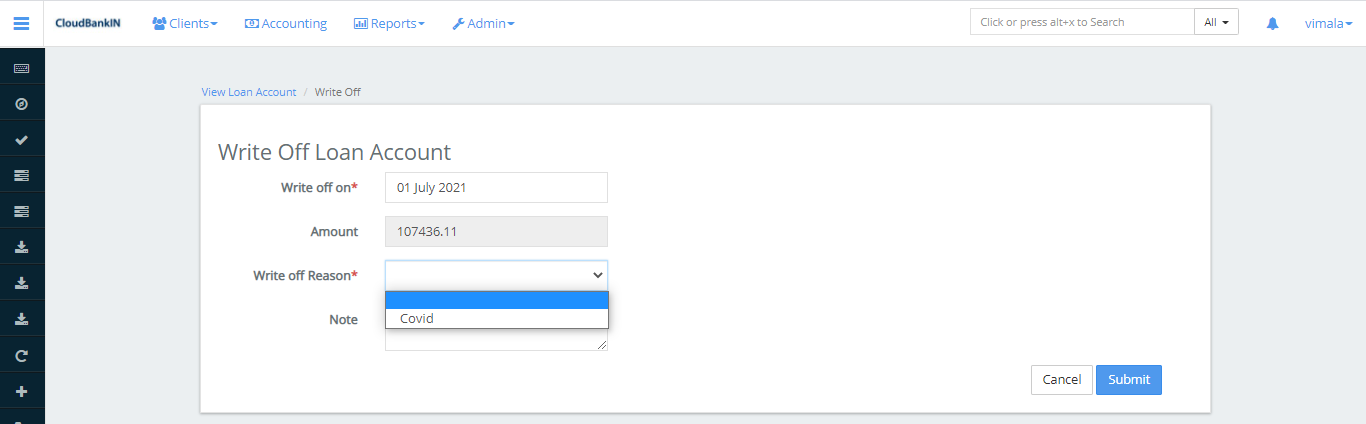
Menu Name and Description
- Write off on (*) – Select the Write Off date
- Amount – Specify the amount you want to Write-Off
- Write off Reason (*) – Choose the reason from drop-down ( You can add your reason in the Admin ->> System ->> Manage Codes ->> Search for WriteOffReasons ->> Add Code Values)
- Note – Specify if you want to add any notes for your future reference
Once you have updated details click on Submit.
Now you can see the amount you have entered is Written-Off in the Personal Loan Form.
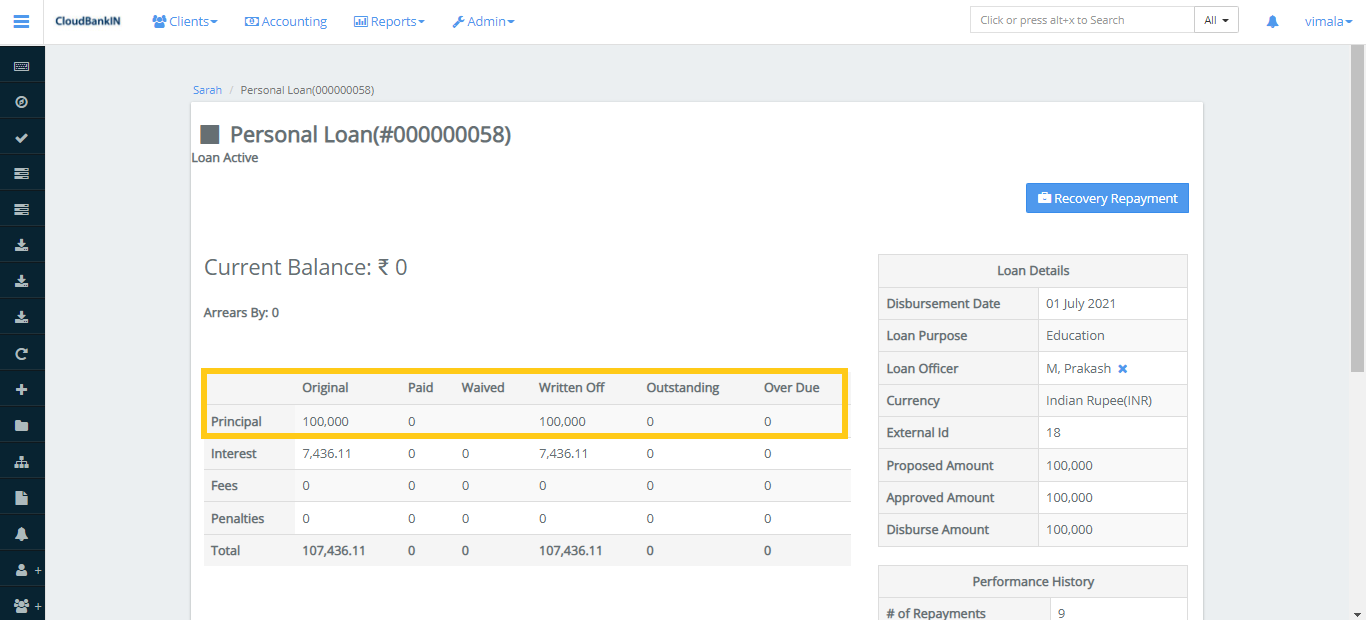
Close (as Rescheduled) – Specifies to close the Loan Account as Rescheduled.
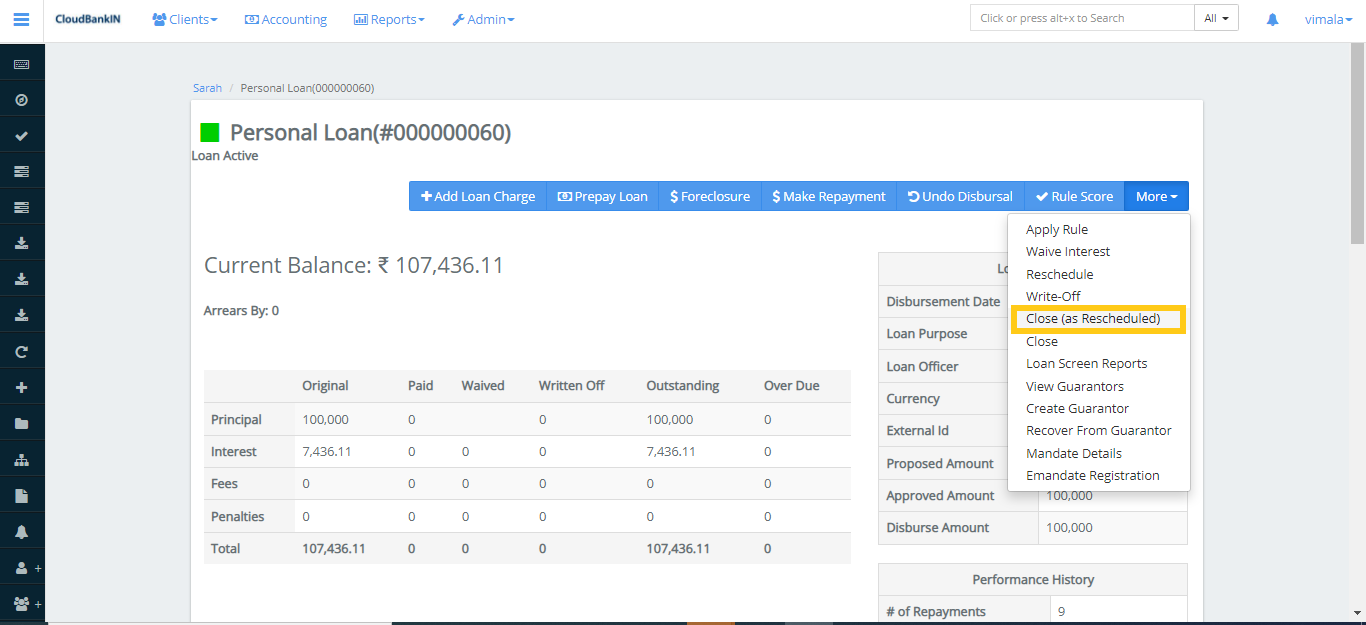
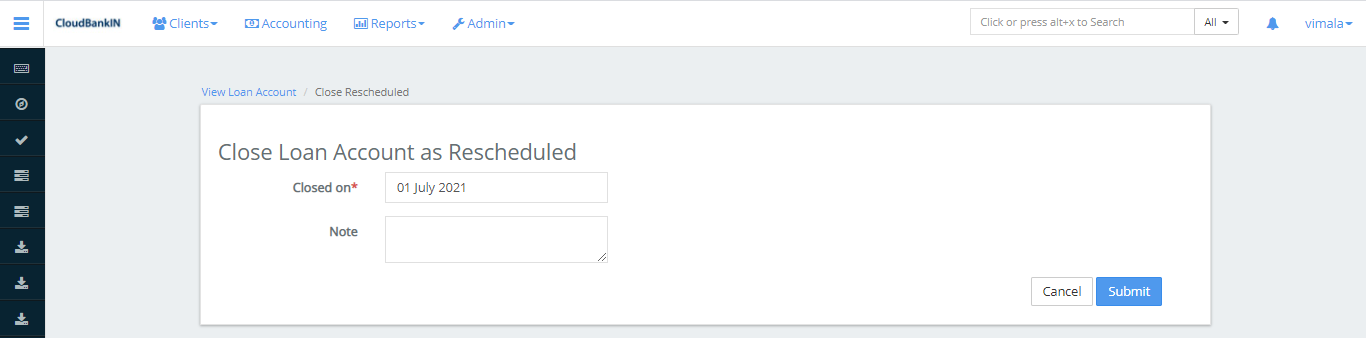
Select the Closing Date of a loan account and click on Submit.
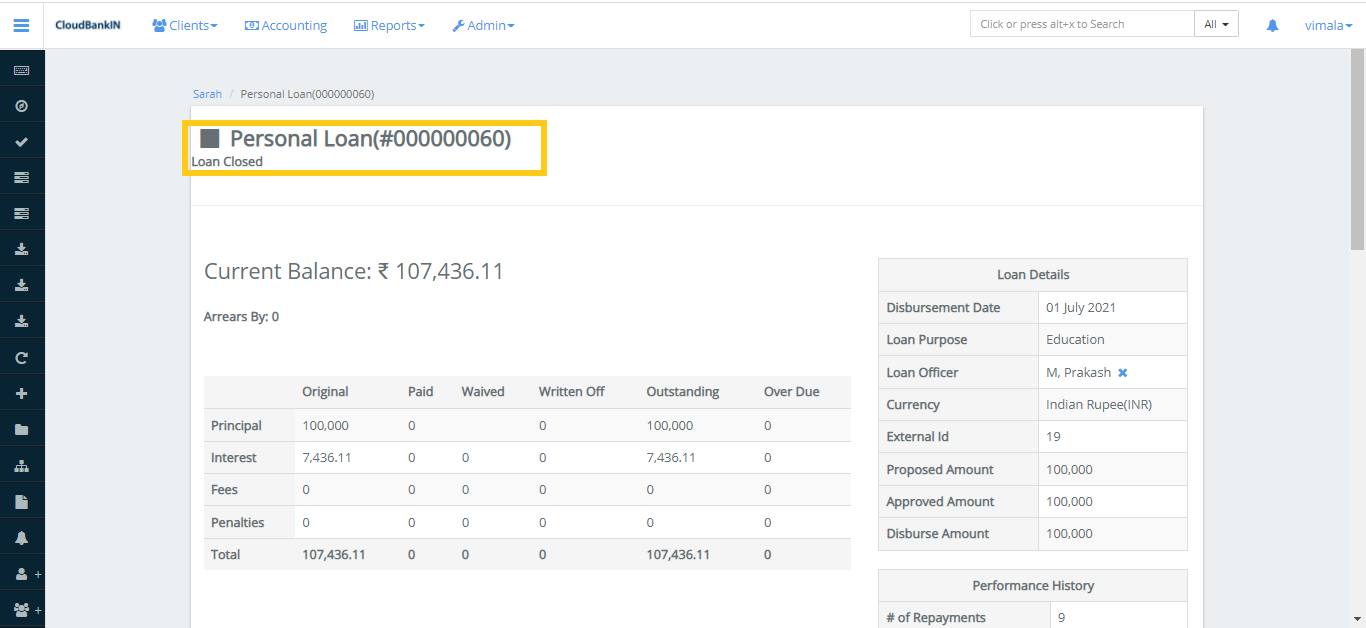
Now you can see the status has changed to Loan Closed as Rescheduled.
Close – Specifies to close the Loan Account once the repayment is completely done.
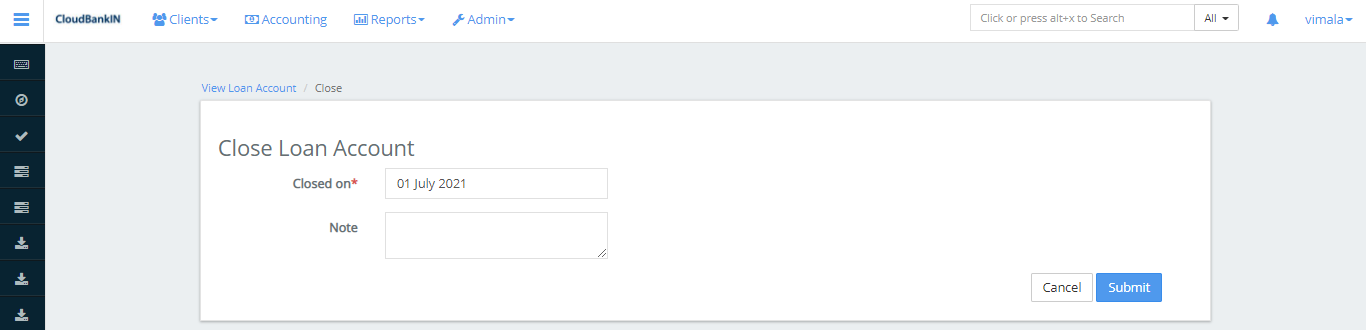
Once you select the date and submit the Loan Account status will be moved to close.
Interest Calculation
Listed few examples below,
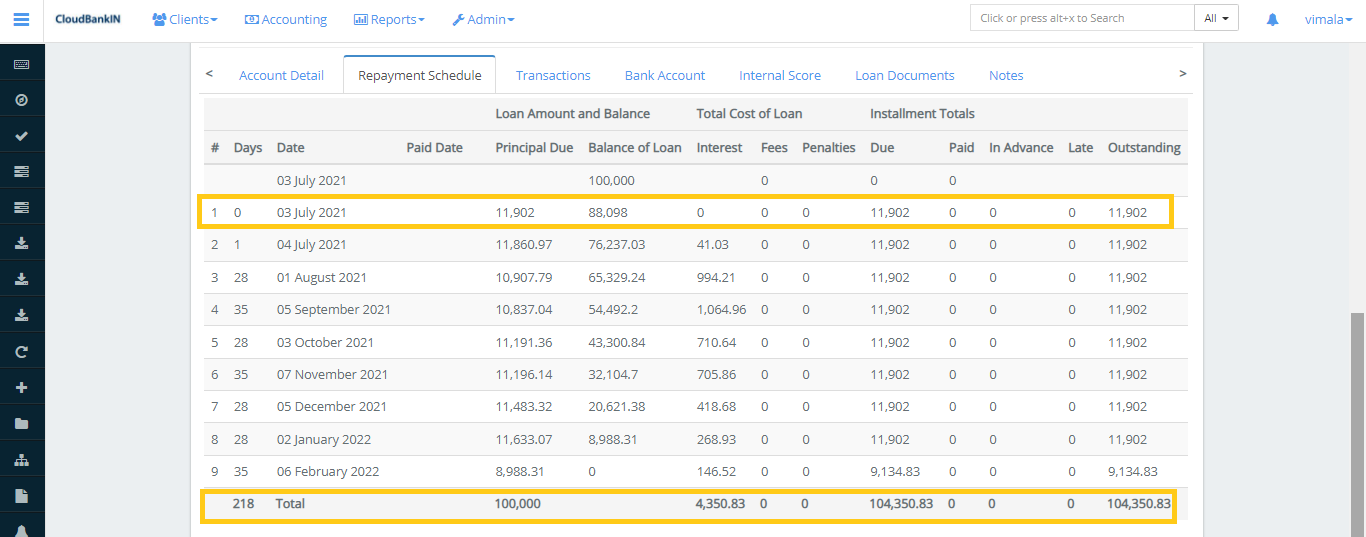
Scenario 1:
- Principal amount – 100,000
- Loan Term – 9 in months
- No of repayments – 9
- Repaid Every – Month
- Nominal Interest Rate – 17% per year
- Interest Method – Declining Balance
- Amortization – Equal Installments
- Interest Calculation Period – Daily
The Total Loan Amount is 100,000, the due amount is 11,902 and the total amount to be paid is 104,441.55
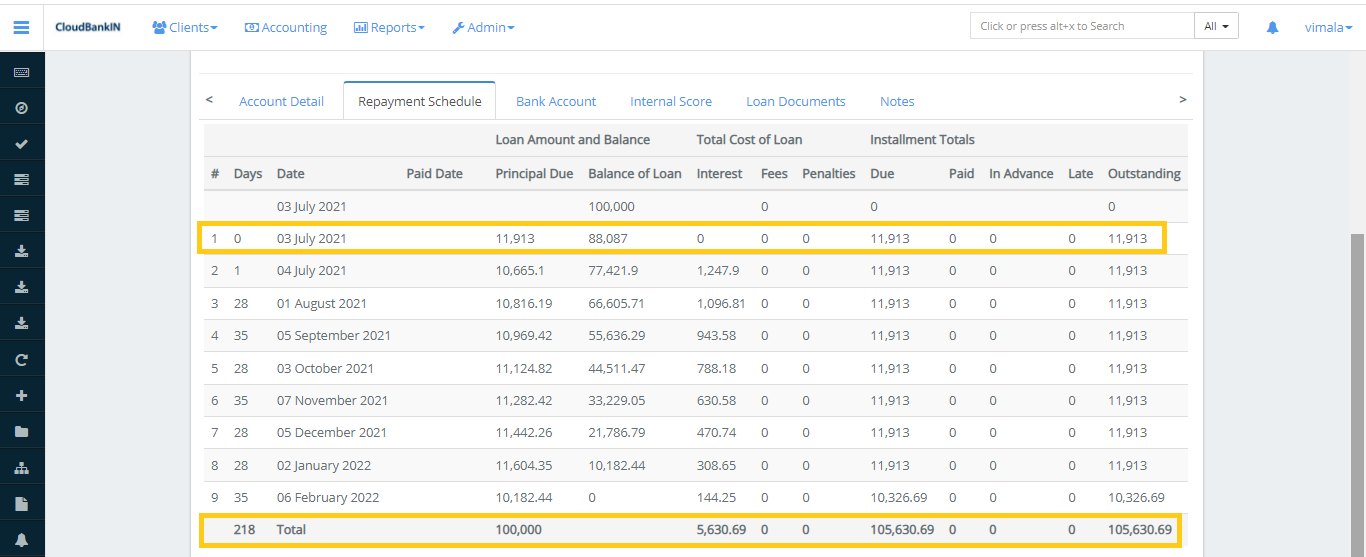
Scenario 2:
- Principal amount – 100,000
- Loan Term – 9 in months
- No of repayments – 9
- Repaid Every – Month
- Nominal Interest Rate – 17% per year
- Interest Method – Declining Balance
- Amortization – Equal Installments
- Interest Calculation Period – Same as the repayment period
The Total Loan Amount is 100,000, the due amount is 11,913 and the total amount to be paid is 105,630.69
So likewise every parameter has a different set of interest calculations and it will reflect the corresponding amount.